Guide:Sequenced textures in LEGO Rock Raiders

This modding guide for the 1999 video game LEGO Rock Raiders details how to add sequenced textures to models in the game.
What are sequenced textures?
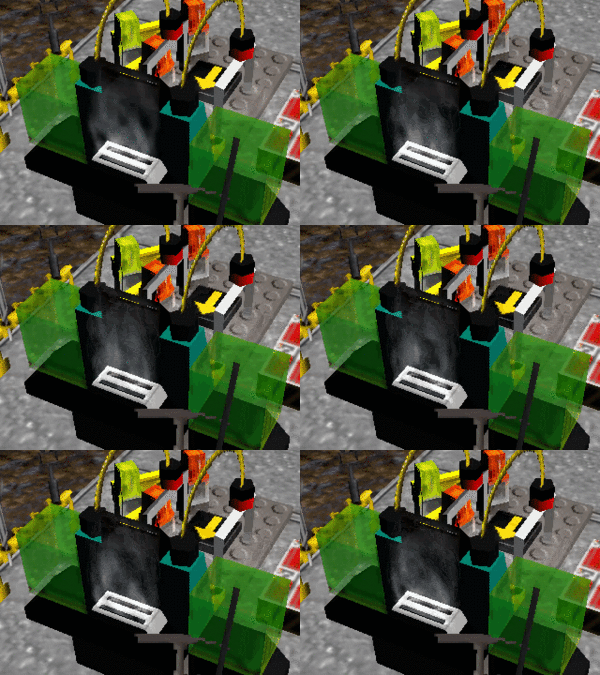
In the Windows version of LEGO Rock Raiders, sequenced textures are textures that are animated in-game using a series of bitmap files. Sequenced textures can be used in any object that uses LightWave Scene files for animations. In the original game they are mostly used only for particle effects, such as steam, dust, and lava smoke.[1]
Sequenced textures must consist of a series of BMP files ending in numbers. They should be sequential (test if they have to be) and should usually start at 1, though they don't have to (but method 2 will be needed). Numbers are usually padded 2–4 places in the base game (eg. example0001.bmp is 4 places); in practice 2 places should be enough except for very long sequences.
Where sequenced textures can be used
Sequenced textures can be used on the following objects in LEGO Rock Raiders, grouped by their entry blocks in the Main LEGO Config File:
- All objects that use AE files:
MiniFigureTypes {}– Rock Raider minifigures. Only one type is in the final game, though it is possible to add more.BuildingTypes {}– Rock Raider buildings. Many of these make extensive use of sequenced textures for steam effects.VehicleTypes {}– Rock Raider vehicles, though not their upgrade parts; see below.RockMonsterTypes {}– Creatures such as the Rock Monster, Slimy Slug, and Small Spider.- Certain
MiscObjects {}entries:Barrier,Dynamite,IceCube,OohScary,Pillar(unused),SpiderWeb.
- All Chief animations found under
Advisor {}andAdvisorPositions640x480 {}(or for other resolutions,AdvisorPositionsWxH {}). - Most
MiscObjects {}entries:BirdScarer,BoulderExplode,BoulderExplodeIce,ElectricFenceStud,Explosion,Freezer,FreezerHit,LazerHit,LavaErosionSmoke1,LavaErosionSmoke2,LavaErosionSmoke3,LavaErosionSmoke4,LaserShot,LongElectricFenceBeam,MiniTeleportUp,PathDust,Pusher,PusherHit,RechargeSparkle,ShortElectricFenceBeam,SmashPath,UpgradeEffect. - Lava smoke, which is defined in the game's executable file for some reason.
Sequenced textures can not be used for:
UpgradeTypes {}– All upgrades for vehicles and buildings are LWO files added on top of the main object, and are not tied to any LWS files. (Confirm LWS upgrades can't be used?)- Certain
MiscObjects {}entries:Boulder,Crystal,ElectricFence,Ore,ProcessedOre. (verify that LWS files can't be used for these) - World
Textures {}– These are applied to flat walls generated by the game engine. Walls and floors can use models in Eye/Shoulder view, but not animations. - All interface images, though FLIC animation files can be used in certain instances.
Specifications
The following requirements:[1]
- The texture files must be 8-bit per pixel (8bpp) BMP files, like all textures in the game.
- The texture file names must end with numbers. The first texture in the sequence should be numbered 1, though starting with 0 or a later number is possible using method 2. The numbers should be padded to the same number of digits for all textures in the sequence; eg.
0001being 4 digits. Numbers are usually padded 2–4 digits in the base game; in practice 2 digits should be enough except for very long sequences. - The LightWave Object file using the sequenced texture must specify it as such. The LWO should link to the first file in the sequence and contain " (sequence)" immediately after the file path.
- The LightWave Object file using the sequenced texture must be used in a LightWave Scene animation file. The LWS should be the same number of frames in length as the sequenced texture, or a number of frames in length that is divisible by the number of frames in the sequenced texture, to ensure that the texture loops properly. As mentioned above, not all objects use animations, particularly upgrade models and certain misc. objects.
Using LightWave 3D 5
This section of the guide details how to create a sequenced texture using LightWave 3D 5. Version 5 was first released in 1995 and was updated to version 5.5 in 1997 and version 5.6 in 1998;[2] one or both of the latter two versions were used in the development of LEGO Rock Raiders. For this guide LightWave 3D 5.6 is being used; this version will still run on Windows 10, but users may find its interface difficult compared to later versions.
The LightWave file formats changed starting in version 6, though many later versions can still save LightWave 5 objects and 5.6 scenes. While these later versions still support sequenced textures, and can load LightWave 5 models that use sequenced textures, they will not properly save sequenced textures in the LightWave 5 format. To get around this, either save your model without sequenced textures and then load it into LightWave 5, or follow the hex editing section below.
In LightWave Modeler (write this out)
Using a hex editor

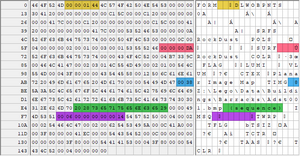
FORMSURFTIMG (sequence) flagIMSQAssuming you already have a way to save textured LightWave 5 models, adding sequenced textures with a hex editor is relatively simple. For this method you may need a basic understanding of hexadecimal numbers, or a calculator that can convert between decimal and hexadecimal numbers.[1] Any functioning hex editor should work for this; the images in this guide use XVI32, a simple and free hex editor that will run on nearly any version of Windows between Windows 95 and Windows 11.
To mark a texture as being sequenced, change its file path to end with " (sequence)" (hexadecimal: 20 28 73 65 71 75 65 6E 63 65 29). For instance, a file path originally reading C:\\Models\example\sample001.bmp
would now be changed to C:\\Models\example\sample001.bmp (sequence). Make sure to include the space between the file extension and the parenthesis; note that this uses a true space (0x20) rather than a null character (0x00). Note that sequences added using this method will not display properly in LightWave, as they are other values usually applied to sequenced textures. However, LEGO Rock Raiders only looks for the flag marking a texture as a sequence and ignores any other sequence properties.
There are three types of values that need to be edited, two of which will have multiple entries to be edited if multiple sequenced textures are used in the same LWO file. Each of these values is stored in the file as a hexadecimal value found following a four-byte ASCII word followed by a number of a certain length; the latter of these is what you will need to edit.[1]
FORM– The LWO file's "magic number" found at its very beginning. Immediately following it is a four-byte value defining the length of the entire file. This value is highlighted yellow in the above image.SURF– Used at the beginning of each surface entry in the LWO file. Immediately following it is a four-byte value defining the length of that surface entry.TIMG– Used at the beginning of each texture entry in the LWO file; these will always be nested within surface entries. Immediately following it is a two-byte value defining the length of the texture's file path, followed by the file path for the texture (or in the case of sequenced textures, the first file in the sequence). Note that LEGO Rock Raiders only cares about the actual texture file name and not its path.
Add 11 (0x0B in hexadecimal) to each of these values. For multiple sequenced textures, you will need to add 11 to each SURF and TIMG value assigned to the entries in question, and then add 11 multiplied by the number of sequences to FORM. (eg. 3 sequenced textures would be 33 extra bytes, or 0x21 in hexadecimal.)
Alternatively, you can avoid most of the above by initially setting the file name of the first BMP in the sequence to have 11 extra characters. After the texture has been applied to the model, you can open the LWO file and delete the extra characters to make space for the " (sequence)" flag, without the file length being affected. Another option is to simply add " (sequence)" to the BMP file name before adding it to the LWO; then edit the LWO to move the placement of .bmp.
- Example: rename the first file in the sequence
abcfrom abc001.bmp to abc001 (sequence).bmp, then once the LWO file has been saved edit the texture's entry to now readabc001.bmp (sequence).
Be sure to rename the BMP to remove " (sequence)" or any other extra charaters before adding the files to the game.
IMSQ block. LEGO Rock Raiders does not require this
This will add an addition 12 bytes (0x1C)
- 2 bytes: The length in bytes of the following values associated with
IMSQ. This seems to always be00 06. - 2 bytes: Frame Offset. Default is 0
- 2 bytes: Loop Sequence and Interlaced options.
00 00for all disabled (default),00 01for Loop Sequence checked,00 02for Interlace checked,00 03for both. - 2 bytes: the Sequence Loop Length. Default is 30 (
00 1E)
References
- ↑ a b c d Sokol, Alan (December 20, 2017) [October 14, 2017]. "Animated Textures on Models". Rock Raiders United. Archived from the original on November 13, 2024.
- ↑ Scott, Dean A.; Vost, Ben (11 September 2024) [2002]. "LightWave History: All the versions of LightWave - so far". LightWave 3D. LightWave Digital. Archived from the original on 26 November 2024. Retrieved 30 November 2024.


