Guide to sequenced textures in LEGO Rock Raiders: Difference between revisions
mNo edit summary |
|||
| (34 intermediate revisions by the same user not shown) | |||
| Line 2: | Line 2: | ||
[[File:Toolstore steam vent rear.gif|thumb|Sequenced textures are frequently used in ''LEGO Rock Raiders'' for steam effects]] | [[File:Toolstore steam vent rear.gif|thumb|Sequenced textures are frequently used in ''LEGO Rock Raiders'' for steam effects]] | ||
This modding guide for the 1999 video game ''[[LEGO Rock Raiders (video game)|LEGO Rock Raiders]]'' | This modding guide for the 1999 video game ''[[LEGO Rock Raiders (video game)|LEGO Rock Raiders]]'' covers '''sequenced textures''' and demonstrates how to add them to models in the game. | ||
== What are sequenced textures? == | == What are sequenced textures? == | ||
| Line 13: | Line 13: | ||
| width2 = 64 | | width2 = 64 | ||
| alt2 = FACE0001.bmp (sequence), a minifigure face talking and blinking | | alt2 = FACE0001.bmp (sequence), a minifigure face talking and blinking | ||
| caption2 = FACE0001 sequence | | caption2 = <!--FACE0001 sequence--> | ||
| footer = Chief's in-game model (left) uses a sequenced texture for his face to | | footer = Chief's in-game model (left) uses a sequenced texture for his face to show him speaking | ||
}} | }} | ||
<span style="image-rendering: pixelated;">{{multiple image | |||
| width = 60 | |||
| image1 = SpiderSB walk sprite.gif | |||
| alt1 = A spider walking | |||
| image2 = SpiderSB stand sprite.gif | |||
| alt2 = A spider standing | |||
| footer = Small Spider sprites | |||
}}</span> | |||
In the Windows version of ''LEGO Rock Raiders'', sequenced textures are textures that are animated in-game using a series of [[Wikipedia:BMP file format|bitmap files]]. Sequenced textures can be used in any object that uses [[LightWave Scene]] files for animations, which includes the majority of objects in the game. In the original game they are mostly used only for particle effects, such as steam, dust, and teleportation.<ref name="rru sequenced guide"/> Some notable exceptions include [[Chief]]'s face during mission briefings, which is animated to show him speaking, and [[Small Spiders]], which consist of a single quad [[Wikipedia:Polygon mesh|polygon]] and use sequenced textures in place of animated models. | |||
=== Where sequenced textures can be used === | === Where sequenced textures can be used === | ||
Sequenced textures can be used on the following objects in ''LEGO Rock Raiders'', grouped by their entry blocks in the [[Main | Sequenced textures can be used on the following objects in ''LEGO Rock Raiders'', grouped by their entry blocks in the [[Main Lego Config File]]: | ||
* All objects that use [[AE | * All objects that use [[AE file]]s: | ||
** <code>MiniFigureTypes {}</code> – Rock Raider minifigures. Only one type is in the final game, though it is possible to add more. | ** <code>MiniFigureTypes {}</code> – Rock Raider minifigures. Only one type is in the final game, though it is possible to add more. | ||
** <code>BuildingTypes {}</code> – Rock Raider buildings. Many of these make extensive use of sequenced textures for steam effects. | ** <code>BuildingTypes {}</code> – Rock Raider buildings. Many of these make extensive use of sequenced textures for steam effects. | ||
** <code>VehicleTypes {}</code> – Rock Raider vehicles, though not their upgrade parts; see below. | ** <code>VehicleTypes {}</code> – Rock Raider vehicles, though not their upgrade parts; see below. | ||
** <code>RockMonsterTypes {}</code> – Creatures such as the [[Rock Monster]] | ** <code>RockMonsterTypes {}</code> – Creatures such as the [[Rock Monster]] and [[Slimy Slug]]. | ||
** Certain <code>MiscObjects {}</code> entries: <code>Barrier</code>, <code>Dynamite</code>, <code>IceCube</code>, <code>OohScary</code>, <code>Pillar</code> (unused), <code>SpiderWeb</code>. | ** Certain <code>MiscObjects {}</code> entries: <code>Barrier</code>, <code>Dynamite</code>, <code>IceCube</code>, <code>OohScary</code>, <code>Pillar</code> (unused), <code>SpiderWeb</code>. | ||
* All Chief animations found under <code>Advisor {}</code> and {{nowrap|<code>AdvisorPositions640x480 {}</code>}} (or for other resolutions, {{nowrap|<code>AdvisorPositionsWxH {}</code>}}). | * All Chief animations found under <code>Advisor {}</code> and {{nowrap|<code>AdvisorPositions640x480 {}</code>}} (or for other resolutions, {{nowrap|<code>AdvisorPositionsWxH {}</code>}}). | ||
* Most <code>MiscObjects {}</code> entries: <code>BirdScarer</code>, <code>BoulderExplode</code>, <code>BoulderExplodeIce</code>, <code>ElectricFenceStud</code>, <code>Explosion</code>, <code>Freezer</code>, <code>FreezerHit</code>, <code>LazerHit</code>, <code>LavaErosionSmoke1</code>, <code>LavaErosionSmoke2</code>, <code>LavaErosionSmoke3</code>, <code>LavaErosionSmoke4</code>, <code>LaserShot</code>, <code>LongElectricFenceBeam</code>, <code>MiniTeleportUp</code>, <code>PathDust</code>, <code>Pusher</code>, <code>PusherHit</code>, <code>RechargeSparkle</code>, <code>ShortElectricFenceBeam</code>, <code>SmashPath</code>, <code>UpgradeEffect</code>. | * Most <code>MiscObjects {}</code> entries: <code>BirdScarer</code>, <code>BoulderExplode</code>, <code>BoulderExplodeIce</code>, <code>ElectricFenceStud</code>, <code>Explosion</code>, <code>Freezer</code>, <code>FreezerHit</code>, <code>LazerHit</code>, <code>LavaErosionSmoke1</code>, <code>LavaErosionSmoke2</code>, <code>LavaErosionSmoke3</code>, <code>LavaErosionSmoke4</code>, <code>LaserShot</code>, <code>LongElectricFenceBeam</code>, <code>MiniTeleportUp</code>, <code>PathDust</code>, <code>Pusher</code>, <code>PusherHit</code>, <code>RechargeSparkle</code>, <code>ShortElectricFenceBeam</code>, <code>SmashPath</code>, <code>UpgradeEffect</code>. | ||
Sequenced textures can not be used for: | [[File:Catramp Barracks steam.png|thumb|320px|Sequenced textures can be used in brief effects as well as continuous ones, as seen in the Support Station's animations]] | ||
* <code>UpgradeTypes {}</code> – All upgrades for vehicles and buildings are LWO files added on top of the main object, and are not tied to any LWS files. (Confirm LWS upgrades can't be used?) | |||
* Certain <code>MiscObjects {}</code> entries: <code>Boulder</code>, <code>Crystal</code>, <code>ElectricFence</code>, <code>Ore</code>, <code>ProcessedOre</code>. ( | Sequenced textures can '''not''' be used for: | ||
* <code>UpgradeTypes {}</code> – All upgrades for vehicles and buildings are LWO files added on top of the main object, and are not tied to any LWS files. ('''Confirm:''' LWS upgrades can't be used?) | |||
* Certain <code>MiscObjects {}</code> entries: <code>Boulder</code>, <code>Crystal</code>, <code>ElectricFence</code>, <code>Ore</code>, <code>ProcessedOre</code>. ('''Confirm:''' can LWS files be used for these? should double check trigger's disassembly) | |||
* World <code>Textures {}</code> – These are applied to flat walls generated by the game engine. Walls and floors can use models in Eye/Shoulder view, but not animations. | * World <code>Textures {}</code> – These are applied to flat walls generated by the game engine. Walls and floors can use models in Eye/Shoulder view, but not animations. | ||
* All interface images, though FLIC animation files can be used | * All interface images, though [[FLIC]] animation files can be used for certain interface elements instead. | ||
=== | === Requirements === | ||
The following requirements:<ref name="rru sequenced guide"/> | [[File:Adst files in World-Shared.png|thumb|The <samp>Adst</samp> sequence files in <samp>World\Shared</samp>, used for dust cloud effects]] | ||
* The texture files must be 8-bit per pixel (8bpp) BMP files, like all textures in the game. | |||
* The texture file names must end with numbers. The first texture in the sequence should be numbered 1, though starting with 0 or a later number is possible using method 2. The numbers should be padded to the same number of digits for all textures in the sequence; eg. <code>0001</code> being 4 digits. Numbers are usually padded 2–4 digits in the base game; in practice 2 digits should be enough | The following requirements must be met for a sequenced texture to work in ''LEGO Rock Raiders'':<ref name="rru sequenced guide"/> | ||
* The [[LightWave Object]] file using the sequenced texture must specify it as such. The LWO should link to the first file in the sequence and contain " (sequence)" | * The texture files used must be 8-bit per pixel (8bpp) BMP files, like all textures in the game. | ||
* The LightWave Object file using the sequenced texture must be used in a LightWave Scene animation file. | * The texture file names must end with numbers. The first texture in the sequence should be numbered 1, though starting with 0 or a later number is possible using method 2. The numbers should be padded to use the same number of digits for all textures in the sequence; eg. <code>0001</code> being 4 digits long. Numbers are usually padded to 2–4 digits in the base game; in practice 2 digits should be enough, unless you are using a very long sequence. | ||
* The [[LightWave Object]] file using the sequenced texture must specify it as such. The LWO should link to the first file in the sequence and contain "<code> (sequence)</code>" at the end of the file path.<ref name="LW format"/> | |||
* The LightWave Object file using the sequenced texture must be used in a LightWave Scene animation file. Ideally, the LWS should be the same number of frames in length as the sequenced texture, or a number of frames in length that is divisible by the number of frames in the sequenced texture, to ensure that the texture loops properly. This is not necessary, but any sequence frames past the end of the LWS animation will be cut off, and certain standing animations are 0 frames long and will not play any sequenced textures. ('''Confirm:''' do sequences play in-game at 25 fps, regardless of the LWS frame rate settings?) | |||
== Using LightWave 3D 5 == | == Using LightWave 3D 5 == | ||
This section of the guide details how to create a sequenced texture using [[Wikipedia:LightWave 3D|LightWave 3D]] 5. Version 5 was first released in 1995 and was updated to version 5.5 in 1997 and version 5.6 in 1998;<ref name="LW history"/> one or both of the latter two versions were used in the development of ''LEGO Rock Raiders''. For this guide LightWave 3D 5.6 is being used; this version will still run on Windows 10, but users may find its interface difficult compared to later versions. | This section of the guide details how to create a sequenced texture using [[Wikipedia:LightWave 3D|LightWave 3D]] 5. Version 5 was first released in 1995 and was updated to version 5.5 in 1997 and version 5.6 in 1998;<ref name="LW history"/> one or both of the latter two versions were used by [[Data Design Interactive]] (and by extension, [[Artworld UK]]) in the development of ''LEGO Rock Raiders''. For this guide LightWave 3D 5.6 is being used; this version will still run on Windows 10, but users may find its interface difficult compared to later versions. If you do not have LightWave, skip this section. | ||
The LightWave file formats changed starting in version 6, though many later versions can still save LightWave 5 objects and 5.6 scenes. While these later versions still support sequenced textures, and can load LightWave 5 models that use sequenced textures, they will '''not''' properly save sequenced textures in the LightWave 5 format. To get around this, either save your model without sequenced textures and then load it into LightWave 5, or follow the hex editing section below. | The LightWave file formats changed starting in version 6, though many later versions can still save LightWave 5 objects and 5.6 scenes. While these later versions still support sequenced textures, and can load LightWave 5 models that use sequenced textures, they will '''not''' properly save sequenced textures in the LightWave 5 format. To get around this, either save your model without sequenced textures and then load it into LightWave 5, or follow the hex editing section below. | ||
In LightWave | <gallery mode=packed heights=250> | ||
LW5 sequence tuto - Modeler example.png | 1. A simple model created in LightWave 5.6; the two colored squares are where we will add our sequenced textures <small>(Actually I made this in LightWave 8 and exported it to here; 5.6 is harder to control)</small> | |||
LightWave 3D 5.6 in Windows NT.png | 2. LightWave 3D 5.6 loaded to an empty scene | |||
</gallery> | |||
This tutorial assumes you already have a model ready to texture. If not, and you do not want to reuse a model form the game's files, you will have to create one – this will be covered in a separate guide. You will also need to have your sequence files created, saved as 8-bit BMPs, and named properly – what these files display, as with the model, is up to you. For this guide, the model we will use is a simple octagonal object with two colored squares, which will each display different flashing numbers – see image 1 above. Once you have your model, open LightWave 3D (the main animation part of the software; see image 2), either via the program's executable or by clicking the "Layout" button in the upper right corner of the Modeler. | |||
<gallery mode=packed heights=250> | |||
LW5 sequence tuto - Objects Panel with model.png | 3. The Objects Panel in LightWave 5; for this guide, the "Load Object" and "Save Object" (or "Replace Object") buttons are the only ones you need to remember | |||
LW5 sequence tuto - example model loaded.png | 4. The model from image 1 loaded into a scene | |||
</gallery> | |||
In LightWave 3D, click the "Object" button in the top toolbar to open the Objects Panel (image 3). On this panel, click "Load Object" and navigate to the LWO file you want to use. You can click "Close Panel" at the bottom to close the object panel, or simply switch to a new panel. The model should now be loaded into the scene (image 5); from here you can move it or even animate it however you want. | |||
<gallery mode=packed heights=250> | |||
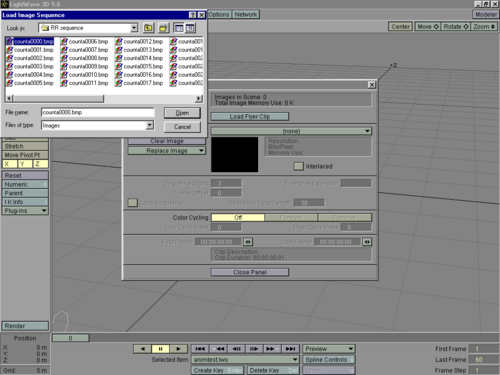
LW5 sequence tuto - Load Image Sequence.png | 5. Loading image sequences; click the first file in the sequence and LightWave will load all of them | |||
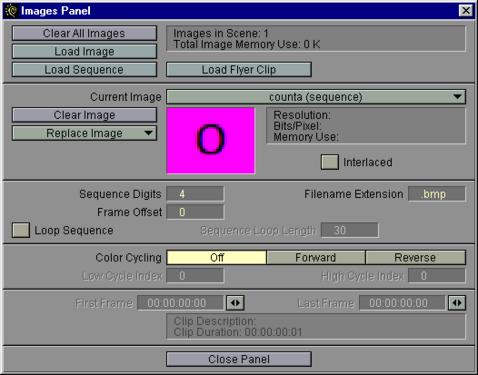
LW5 sequence tuto - Images Panel with sequence.png | 6. A sequence loaded in the Images Panel | |||
</gallery> | |||
Click the "Images" button in the top toolbar to open the Images Panel. Click "Load Sequence" and navigate to the BMP files you want to use (image 5). Select the first entry in the sequence; this should be the file numbered 1, though one numbered 0 can be selected. File 0 will be set to frame 0, which ''can'' be viewed in the animation editor but will ''not'' display when playing the animation, which will start on frame 1; this also applies to when the animation is loaded into ''LEGO Rock Raiders''. If there is no file 0, frame 0 will show a completely black image, so including a file 0 that is a duplicate of file 1 may be helpful while editing. You can set file 0 to be the first one via hex editing though. | |||
Once the sequence has been loaded, LightWave will automatically detect the amount of digits in the sequence number and will play all detected images in the sequence (image 6). The number of files in the sequence can be increased or decreased by adding or removing them, or the files can be edited, and LightWave will automatically change the animation without having to reload. In LightWave, the sequence will stop once it reaches the last file, and stay there until the entire animation loops back to the beginning. You can enable "Loop Sequence" and set the Sequence Loop Length to how long the sequence is to fix this. However, ''LEGO Rock Raiders'' will automatically loop the sequence regardless, and in fact appears to completely ignore this setting, so this is only to make editing easier. | |||
<gallery mode=packed heights=250> | |||
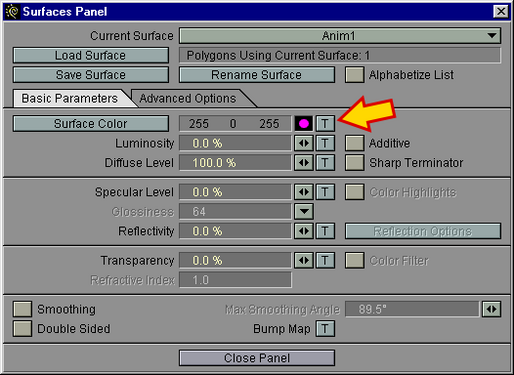
LW5 sequence tuto - Surfaces Panel.png | 7. The Surface Panel; an arrow is pointing to the texture button mentioned below | |||
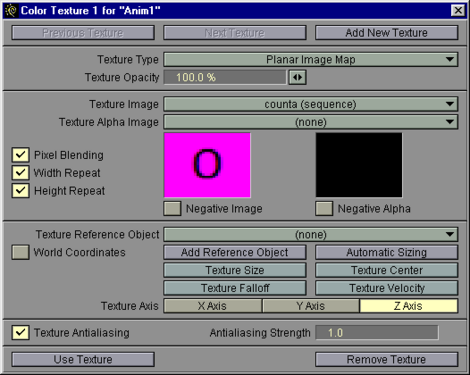
LW5 sequence tuto - Color Texture 1.png | 8. The Color Texture panel for the surface selected in image 7 | |||
</gallery> | |||
Close the Images Panel and click the "Surfaces" button in the top toolbar to open the Surfaces Panel (image 7). Make sure the Current Surface drop-down menu is set to the surface you want to apply the sequenced texture to. Under the Basic Parameters tab, click the "T" (texture) button to the right of the first entry, Surface Color, to open the Color Texture panel for that surface (image 8). Click the Texture Image drop-down menu and select the sequence you want to use. | |||
You can adjust the image to fit on the surface the way you want, using the options in the bottom half of the panel; you will likely need to resize it (in some situations, this can be easily done using "Automatic Sizing" and may need to change the Texture Axis depending on the direction the surface is angled (''in the LWO'' – rotating the model in the LWS will not affect this). In some situations the texture may be applied mirrored, and you will have to manually change the Texture Size (possibly fixed by setting a value to a negative number). Click "Use Texture" to close this panel. | |||
== | <gallery mode=packed heights=250> | ||
LW5 sequence tuto - example model with textures.png | 9. The model with its sequenced textures applied | |||
LW5 sequence tuto - example model moved.png | 10. The animation on frame 17, showing the progression of both numbers; the model has also been moved | |||
</gallery> | |||
Once you have finished applying all textures, open the Objects Panel again and save the LWO model. | |||
If you want to save the LWS animation as well, make sure the animation's frame rate is set to what you want. Editing "Last Frame" in the bottom right corner will not be enough (see if LRR reads this at all); you need to click the "Render" button in the bottom left to open the render panel and set "Render Last Frame" to what you want. (This part may need to be moved to a general LightWave tutorial). Click "File" in the top left corner and click "Save Scene" to save the animation. | |||
<gallery mode=packed heights=240> | |||
LW5 sequence number board.gif | 11. The sample model loaded into ''LEGO Rock Raiders''; the GIF has been slowed down so each number can be seen | |||
</gallery> | |||
Here is the model in the game. It is crude, but it serves its purpose in showing how sequenced textures work. The left panel on the model counts from 0 to 24, while the right panel counts from 0 to 3. The frame rate of the animation and sequences are both defined by the game's global timer, which runs at 25 frames per second; the frame rate defined in the LWS file is ignored by the game.<ref name="rru sequenced guide"/> The entire animation is 50 frames long, which takes two seconds at default speed; the above GIF recording has been significantly slowed down. This lenght lets the left texture play exactly twice and the right one play twelve times. As 50 is not divisible by 4, you may notice that the right texture gets abruptly cut off during one of its sequences, when the LWS animation reaches its last frame and loops back to the beginning; this will happen to any sequenced textures that do not line up exactly with the length of the animation. This should usually be avoided if possible, though how you avoid or even take advantage of this is up to you. | |||
== Using a hex editor == | |||
[[File:XVI32 LWO sequence affected values (highlights).png|thumb|An LWO file in a hex editor; the relevant values mentioned in this guide have been highlighted with different colors: | |||
{{legend|#EACF49|4-byte value for <code>FORM</code>}} {{legend|#F06682|4-byte value for <code>SURF</code>}} {{legend|#49B2F0|2-byte value for <code>TIMG</code>}} {{legend|#49C557|11-byte <code> (sequence)</code> flag}} {{legend|#B649E8|8-byte value for <code>IMSQ</code> (optional)}}]] | |||
Assuming you already have a way to save textured LightWave 5 models, adding sequenced textures with a [[Wikipedia:Hex editor|hex editor]] is relatively simple. For this method you may need a basic understanding of [[Wikipedia:Hexadecimal|hexadecimal]] numbers, or a calculator that can convert between [[Wikipedia:Decimal|decimal]] and hexadecimal numbers.<ref name="rru sequenced guide"/> Any functioning hex editor should work for this; the images in this guide use [http://www.chmaas.handshake.de/delphi/freeware/xvi32/xvi32.htm XVI32], a simple and free hex editor that will run on nearly any version of Windows between [[Wikipedia:Windows 95|Windows 95]] and [[Wikipedia:Windows 11|Windows 11]]. | |||
To mark a texture as being sequenced, change its file path string to end with "<code> (sequence)</code>" (hexadecimal: <code>20 28 73 65 71 75 65 6E 63 65 29</code>). For instance, a file path originally reading <code>C:\\Models\example\sample001.bmp</code> would now be changed to <code>C:\\Models\example\sample001.bmp (sequence)</code>. This changes the file path from linking to a single image to instead specifying the file name prefix for a numbered series of images.<ref name="LW format"/> Make sure to include the space between the file extension and the parenthesis; note that this uses a true space (<code>0x20</code>) rather than a null character (<code>0x00</code>).<ref name="rru sequenced guide"/> | |||
As this edit will change the file length, additional edits are required to prevent the LWO model from being considered invalid. There are three types of values that need to be edited, two of which will have multiple entries to be edited if multiple sequenced textures are used in the same LWO file. Each of these values is stored in the file as a [[Wikipedia:hexadecimal|hexadecimal]] integer and can be found immediately after a four-byte [[Wikipedia:ASCII|ASCII]] "ID tag".<ref name="LW format"/> These values are:<ref name="rru sequenced guide"/> | |||
* <code>FORM</code> – | * <code>FORM</code> – Used at the beginning of the file to define its type. Immediately following it is a four-byte value defining the length of the entire file.<ref name="LW format"/> | ||
* <code>SURF</code> – Used at the beginning of each surface | * <code>SURF</code> – Used at the beginning of each surface definition in the LWO file. Immediately following it is a four-byte value defining the length of that SURF chunk.<ref name="LW format"/> | ||
* <code>TIMG</code> – Used at the beginning of each texture | * <code>TIMG</code> – Used at the beginning of each texture definition in the LWO file; these will always be nested within SURF chunks. Immediately following it is a two-byte value defining the length of that TIMG sub-chunk, followed by the file path for the texture (or in the case of sequenced textures, the first file in the sequence).<ref name="LW format"/> Note that ''LEGO Rock Raiders'' only cares about the actual texture file name and not its path. | ||
As the <code> (sequence)</code> flag is 11 bytes long, you will need to add 11 (<code>0x0B</code> in hexadecimal) to each of these values. For multiple sequenced textures, you will need to add 11 to each <code>SURF</code> and <code>TIMG</code> chunk length value assigned to the chunks containing the sequence, and then add 11 multiplied by the number of sequences to <code>FORM</code>. 2 sequenced textures would be 22 extra bytes (<code>0x16</code> in hexadecimal), 3 sequenced textures would be 33 extra bytes (<code>0x21</code>), etc.<ref name="rru sequenced guide"/> Make sure to only edit the <code>SURF</code> and <code>TIMG</code> entry or entries that contain your sequenced textures. | |||
Alternatively, you can avoid most of the above by initially | Alternatively, you can avoid most of the above by initially changing the file name of the first BMP in the sequence to have 11 extra characters. After the texture has been applied to the model, you can open the LWO file and delete the extra characters to make space for the <code> (sequence)</code> flag, without the file length being affected. Another option is to simply add "<kbd> (sequence)</kbd>" to the BMP file name before adding it to the model, then edit the LWO to move the placement of <code>.bmp</code>. Example: rename the first file in the sequence <code>abc</code> from <samp>abc001.bmp</samp> to <samp>abc001 (sequence).bmp</samp>, then once the LWO file has been saved edit the texture's entry to now read <code>abc001.bmp (sequence)</code>. Be sure to rename the BMP file to remove "<samp> (sequence)</samp>" or any other extra characters before adding the files to the game. | ||
Be sure to rename the BMP to remove " (sequence)" or any other extra | |||
<code>IMSQ</code> | === Optional IMSQ fix === | ||
'''Optional:''' When saving a sequence using LightWave 5, the LWO file will contain an <code>IMSQ</code> chunk after the two null characters following the texture path. ''LEGO Rock Raiders'' does not require this data to display sequenced textures, but LightWave does, and sequences added using the above hex editor method will not be loaded (LightWave will think that <code> (sequence)</code> is part of the file name without an <code>IMSQ</code> ID tag). If you want to make your model fully compatible with LightWave, you can add this chunk after each sequence entry; this will add an addition 12 bytes (<code>0x1C</code>) per entry to <code>FORM</code>, <code>SURF</code>, and <code>TIMG</code>. The values following <code>IMSQ</code> are:<ref name="LW format"/> | |||
* 2 bytes: The length in bytes of the <code>IMSQ</code> entry. Always <code>00 06</code>. | |||
* 2 bytes: The length in bytes of the | |||
* 2 bytes: Frame Offset. Default is 0 | * 2 bytes: Frame Offset. Default is 0 | ||
* 2 bytes: Loop Sequence and Interlaced options. <code>00 00</code> for all disabled (default), <code>00 01</code> for Loop Sequence checked, <code>00 02</code> for Interlace checked, <code>00 03</code> for both. | * 2 bytes: Loop Sequence and Interlaced options. <code>00 00</code> for all disabled (default), <code>00 01</code> for Loop Sequence checked, <code>00 02</code> for Interlace checked, <code>00 03</code> for both. | ||
* 2 bytes: the Sequence Loop Length. Default is 30 (<code>00 1E</code>) | * 2 bytes: the Sequence Loop Length. Default is 30 (<code>00 1E</code>), though you may want to change it to be the length of the sequence used. | ||
The default hexadecimal data added would be <code>49 4D 53 51 00 06 00 00 00 00 00 1E</code>. However some files in ''Rock Raiders'' have Loop Sequence enabled and the Sequence Loop Length set to a different number, likely based on the length of the sequence. | |||
=== Tips === | |||
Some important tips to remember, especially if you are new to hex editing: | |||
* When editing values, make sure that you are ''overwriting'' the existing numbers rather than adding new ones, or the file's structure will be corrupted and it will be considered invalid.<ref name="rru sequenced guide"/> | |||
* Remember that each hexadecimal byte is written as two digits, so you will need to add a leading zero if your value has an odd number of digits; for instance, if your calculator gives you a value of 1A4, you will need to write it in the file as <code>01 A4</code>.<ref name="rru sequenced guide"/> | |||
* All values in LWO files [[Wikipedia:big-endian|big-endian]], so you will not have to to swap the byte order of your calculated numbers like when editing [[Wikipedia:little-endian|little-endian]] files. (Example: 1A4 written in four bytes would be <code>00 00 01 A4</code> in big-endian order, and <code>A4 01 00 00</code> in little-endian order.) The latter is used in some other [[Wikipedia:Binary file|binary files]] in ''Rock Raiders'', such as map files and the [[DDI Wad|WAD]] headers. | |||
== References == | == References == | ||
{{reflist |refs= | {{reflist |refs= | ||
<ref name="LW format">{{cite web |url=http://tihlde.org/~torbjorv/aquarium2/resources/lwo.txt |title=LightWave 3D Object File Format |date=October 16, 1996 |archive-url=http://web.archive.org/web/20050222164514/http://tihlde.org/~torbjorv/aquarium2/resources/lwo.txt |archive-date=22 February 2005}}</ref> | |||
<ref name="LW history">{{cite web |url=https://www.lightwave3d.com/documentation/lightwave-history/ |title=LightWave History: All the versions of LightWave - so far |website=LightWave 3D |first1=Dean A. |last1=Scott |first2=Ben |last2=Vost |date=11 September 2024 |orig-date=2002 |publisher=LightWave Digital |archive-url=https://web.archive.org/web/20241126184139/https://www.lightwave3d.com/documentation/lightwave-history/ |archive-date=26 November 2024 |url-status=live |access-date=30 November 2024}}</ref> | <ref name="LW history">{{cite web |url=https://www.lightwave3d.com/documentation/lightwave-history/ |title=LightWave History: All the versions of LightWave - so far |website=LightWave 3D |first1=Dean A. |last1=Scott |first2=Ben |last2=Vost |date=11 September 2024 |orig-date=2002 |publisher=LightWave Digital |archive-url=https://web.archive.org/web/20241126184139/https://www.lightwave3d.com/documentation/lightwave-history/ |archive-date=26 November 2024 |url-status=live |access-date=30 November 2024}}</ref> | ||
<ref name="rru sequenced guide">{{cite web |url=https://rockraidersunited.com/guides/animated-textures-on-models-r2/ | | <ref name="rru sequenced guide">{{cite web |url=https://rockraidersunited.com/guides/animated-textures-on-models-r2/ |author=Cirevam |date=December 20, 2017 |orig-date=October 14, 2017 |title=Animated Textures on Models |website=[[Rock Raiders United]] |archive-url=https://web.archive.org/web/20241113053428/https://rockraidersunited.com/guides/animated-textures-on-models-r2/ |archive-date=November 13, 2024 |url-status=live}} [https://www.youtube.com/watch?v=tCr7XSEzUlg Video version] available via YouTube.</ref> | ||
}} | }} | ||
[[Category: | [[Category:Guides|sequenced textures in LEGO Rock Raiders]] | ||
Latest revision as of 22:30, 3 February 2025

This modding guide for the 1999 video game LEGO Rock Raiders covers sequenced textures and demonstrates how to add them to models in the game.
What are sequenced textures?
.gif)

In the Windows version of LEGO Rock Raiders, sequenced textures are textures that are animated in-game using a series of bitmap files. Sequenced textures can be used in any object that uses LightWave Scene files for animations, which includes the majority of objects in the game. In the original game they are mostly used only for particle effects, such as steam, dust, and teleportation.[1] Some notable exceptions include Chief's face during mission briefings, which is animated to show him speaking, and Small Spiders, which consist of a single quad polygon and use sequenced textures in place of animated models.
Where sequenced textures can be used
Sequenced textures can be used on the following objects in LEGO Rock Raiders, grouped by their entry blocks in the Main Lego Config File:
- All objects that use AE files:
MiniFigureTypes {}– Rock Raider minifigures. Only one type is in the final game, though it is possible to add more.BuildingTypes {}– Rock Raider buildings. Many of these make extensive use of sequenced textures for steam effects.VehicleTypes {}– Rock Raider vehicles, though not their upgrade parts; see below.RockMonsterTypes {}– Creatures such as the Rock Monster and Slimy Slug.- Certain
MiscObjects {}entries:Barrier,Dynamite,IceCube,OohScary,Pillar(unused),SpiderWeb.
- All Chief animations found under
Advisor {}andAdvisorPositions640x480 {}(or for other resolutions,AdvisorPositionsWxH {}). - Most
MiscObjects {}entries:BirdScarer,BoulderExplode,BoulderExplodeIce,ElectricFenceStud,Explosion,Freezer,FreezerHit,LazerHit,LavaErosionSmoke1,LavaErosionSmoke2,LavaErosionSmoke3,LavaErosionSmoke4,LaserShot,LongElectricFenceBeam,MiniTeleportUp,PathDust,Pusher,PusherHit,RechargeSparkle,ShortElectricFenceBeam,SmashPath,UpgradeEffect.

Sequenced textures can not be used for:
UpgradeTypes {}– All upgrades for vehicles and buildings are LWO files added on top of the main object, and are not tied to any LWS files. (Confirm: LWS upgrades can't be used?)- Certain
MiscObjects {}entries:Boulder,Crystal,ElectricFence,Ore,ProcessedOre. (Confirm: can LWS files be used for these? should double check trigger's disassembly) - World
Textures {}– These are applied to flat walls generated by the game engine. Walls and floors can use models in Eye/Shoulder view, but not animations. - All interface images, though FLIC animation files can be used for certain interface elements instead.
Requirements

The following requirements must be met for a sequenced texture to work in LEGO Rock Raiders:[1]
- The texture files used must be 8-bit per pixel (8bpp) BMP files, like all textures in the game.
- The texture file names must end with numbers. The first texture in the sequence should be numbered 1, though starting with 0 or a later number is possible using method 2. The numbers should be padded to use the same number of digits for all textures in the sequence; eg.
0001being 4 digits long. Numbers are usually padded to 2–4 digits in the base game; in practice 2 digits should be enough, unless you are using a very long sequence. - The LightWave Object file using the sequenced texture must specify it as such. The LWO should link to the first file in the sequence and contain "
(sequence)" at the end of the file path.[2] - The LightWave Object file using the sequenced texture must be used in a LightWave Scene animation file. Ideally, the LWS should be the same number of frames in length as the sequenced texture, or a number of frames in length that is divisible by the number of frames in the sequenced texture, to ensure that the texture loops properly. This is not necessary, but any sequence frames past the end of the LWS animation will be cut off, and certain standing animations are 0 frames long and will not play any sequenced textures. (Confirm: do sequences play in-game at 25 fps, regardless of the LWS frame rate settings?)
Using LightWave 3D 5
This section of the guide details how to create a sequenced texture using LightWave 3D 5. Version 5 was first released in 1995 and was updated to version 5.5 in 1997 and version 5.6 in 1998;[3] one or both of the latter two versions were used by Data Design Interactive (and by extension, Artworld UK) in the development of LEGO Rock Raiders. For this guide LightWave 3D 5.6 is being used; this version will still run on Windows 10, but users may find its interface difficult compared to later versions. If you do not have LightWave, skip this section.
The LightWave file formats changed starting in version 6, though many later versions can still save LightWave 5 objects and 5.6 scenes. While these later versions still support sequenced textures, and can load LightWave 5 models that use sequenced textures, they will not properly save sequenced textures in the LightWave 5 format. To get around this, either save your model without sequenced textures and then load it into LightWave 5, or follow the hex editing section below.
-
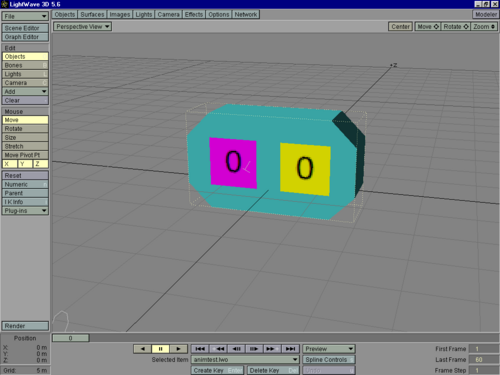
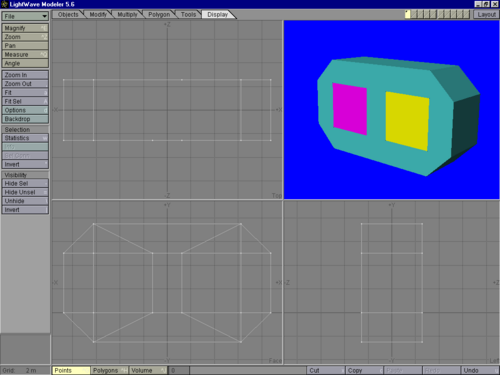 1. A simple model created in LightWave 5.6; the two colored squares are where we will add our sequenced textures (Actually I made this in LightWave 8 and exported it to here; 5.6 is harder to control)
 -
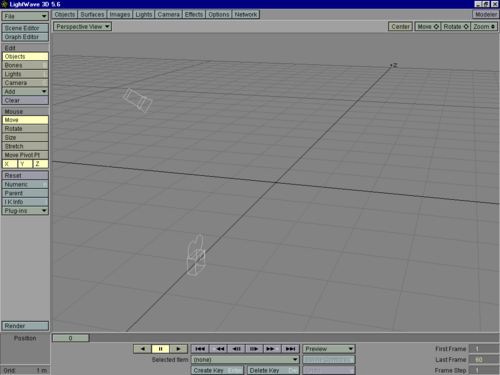 2. LightWave 3D 5.6 loaded to an empty scene


This tutorial assumes you already have a model ready to texture. If not, and you do not want to reuse a model form the game's files, you will have to create one – this will be covered in a separate guide. You will also need to have your sequence files created, saved as 8-bit BMPs, and named properly – what these files display, as with the model, is up to you. For this guide, the model we will use is a simple octagonal object with two colored squares, which will each display different flashing numbers – see image 1 above. Once you have your model, open LightWave 3D (the main animation part of the software; see image 2), either via the program's executable or by clicking the "Layout" button in the upper right corner of the Modeler.
-
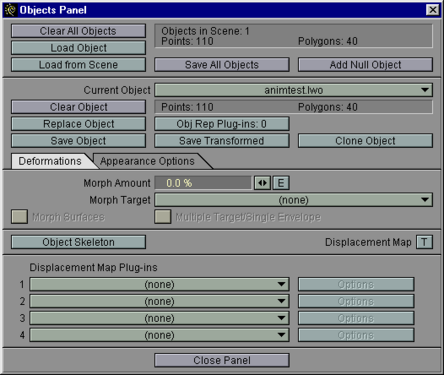 3. The Objects Panel in LightWave 5; for this guide, the "Load Object" and "Save Object" (or "Replace Object") buttons are the only ones you need to remember
 -
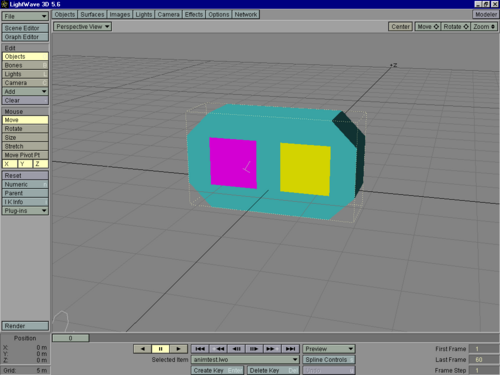 4. The model from image 1 loaded into a scene


In LightWave 3D, click the "Object" button in the top toolbar to open the Objects Panel (image 3). On this panel, click "Load Object" and navigate to the LWO file you want to use. You can click "Close Panel" at the bottom to close the object panel, or simply switch to a new panel. The model should now be loaded into the scene (image 5); from here you can move it or even animate it however you want.
-
 5. Loading image sequences; click the first file in the sequence and LightWave will load all of them
 -
 6. A sequence loaded in the Images Panel


Click the "Images" button in the top toolbar to open the Images Panel. Click "Load Sequence" and navigate to the BMP files you want to use (image 5). Select the first entry in the sequence; this should be the file numbered 1, though one numbered 0 can be selected. File 0 will be set to frame 0, which can be viewed in the animation editor but will not display when playing the animation, which will start on frame 1; this also applies to when the animation is loaded into LEGO Rock Raiders. If there is no file 0, frame 0 will show a completely black image, so including a file 0 that is a duplicate of file 1 may be helpful while editing. You can set file 0 to be the first one via hex editing though.
Once the sequence has been loaded, LightWave will automatically detect the amount of digits in the sequence number and will play all detected images in the sequence (image 6). The number of files in the sequence can be increased or decreased by adding or removing them, or the files can be edited, and LightWave will automatically change the animation without having to reload. In LightWave, the sequence will stop once it reaches the last file, and stay there until the entire animation loops back to the beginning. You can enable "Loop Sequence" and set the Sequence Loop Length to how long the sequence is to fix this. However, LEGO Rock Raiders will automatically loop the sequence regardless, and in fact appears to completely ignore this setting, so this is only to make editing easier.
-
 7. The Surface Panel; an arrow is pointing to the texture button mentioned below
 -
 8. The Color Texture panel for the surface selected in image 7


Close the Images Panel and click the "Surfaces" button in the top toolbar to open the Surfaces Panel (image 7). Make sure the Current Surface drop-down menu is set to the surface you want to apply the sequenced texture to. Under the Basic Parameters tab, click the "T" (texture) button to the right of the first entry, Surface Color, to open the Color Texture panel for that surface (image 8). Click the Texture Image drop-down menu and select the sequence you want to use.
You can adjust the image to fit on the surface the way you want, using the options in the bottom half of the panel; you will likely need to resize it (in some situations, this can be easily done using "Automatic Sizing" and may need to change the Texture Axis depending on the direction the surface is angled (in the LWO – rotating the model in the LWS will not affect this). In some situations the texture may be applied mirrored, and you will have to manually change the Texture Size (possibly fixed by setting a value to a negative number). Click "Use Texture" to close this panel.
-
 9. The model with its sequenced textures applied
 -
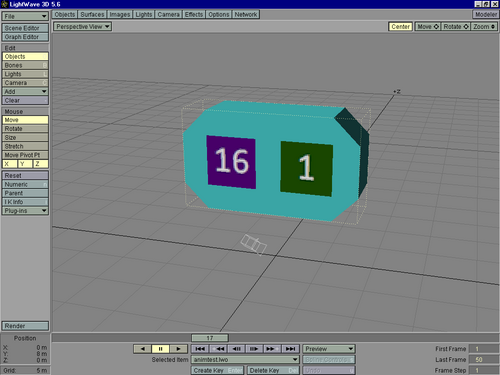 10. The animation on frame 17, showing the progression of both numbers; the model has also been moved


Once you have finished applying all textures, open the Objects Panel again and save the LWO model.
If you want to save the LWS animation as well, make sure the animation's frame rate is set to what you want. Editing "Last Frame" in the bottom right corner will not be enough (see if LRR reads this at all); you need to click the "Render" button in the bottom left to open the render panel and set "Render Last Frame" to what you want. (This part may need to be moved to a general LightWave tutorial). Click "File" in the top left corner and click "Save Scene" to save the animation.
-
 11. The sample model loaded into LEGO Rock Raiders; the GIF has been slowed down so each number can be seen

Here is the model in the game. It is crude, but it serves its purpose in showing how sequenced textures work. The left panel on the model counts from 0 to 24, while the right panel counts from 0 to 3. The frame rate of the animation and sequences are both defined by the game's global timer, which runs at 25 frames per second; the frame rate defined in the LWS file is ignored by the game.[1] The entire animation is 50 frames long, which takes two seconds at default speed; the above GIF recording has been significantly slowed down. This lenght lets the left texture play exactly twice and the right one play twelve times. As 50 is not divisible by 4, you may notice that the right texture gets abruptly cut off during one of its sequences, when the LWS animation reaches its last frame and loops back to the beginning; this will happen to any sequenced textures that do not line up exactly with the length of the animation. This should usually be avoided if possible, though how you avoid or even take advantage of this is up to you.
Using a hex editor
.png)
FORMSURFTIMG (sequence) flagIMSQ (optional)Assuming you already have a way to save textured LightWave 5 models, adding sequenced textures with a hex editor is relatively simple. For this method you may need a basic understanding of hexadecimal numbers, or a calculator that can convert between decimal and hexadecimal numbers.[1] Any functioning hex editor should work for this; the images in this guide use XVI32, a simple and free hex editor that will run on nearly any version of Windows between Windows 95 and Windows 11.
To mark a texture as being sequenced, change its file path string to end with " (sequence)" (hexadecimal: 20 28 73 65 71 75 65 6E 63 65 29). For instance, a file path originally reading C:\\Models\example\sample001.bmp would now be changed to C:\\Models\example\sample001.bmp (sequence). This changes the file path from linking to a single image to instead specifying the file name prefix for a numbered series of images.[2] Make sure to include the space between the file extension and the parenthesis; note that this uses a true space (0x20) rather than a null character (0x00).[1]
As this edit will change the file length, additional edits are required to prevent the LWO model from being considered invalid. There are three types of values that need to be edited, two of which will have multiple entries to be edited if multiple sequenced textures are used in the same LWO file. Each of these values is stored in the file as a hexadecimal integer and can be found immediately after a four-byte ASCII "ID tag".[2] These values are:[1]
FORM– Used at the beginning of the file to define its type. Immediately following it is a four-byte value defining the length of the entire file.[2]SURF– Used at the beginning of each surface definition in the LWO file. Immediately following it is a four-byte value defining the length of that SURF chunk.[2]TIMG– Used at the beginning of each texture definition in the LWO file; these will always be nested within SURF chunks. Immediately following it is a two-byte value defining the length of that TIMG sub-chunk, followed by the file path for the texture (or in the case of sequenced textures, the first file in the sequence).[2] Note that LEGO Rock Raiders only cares about the actual texture file name and not its path.
As the (sequence) flag is 11 bytes long, you will need to add 11 (0x0B in hexadecimal) to each of these values. For multiple sequenced textures, you will need to add 11 to each SURF and TIMG chunk length value assigned to the chunks containing the sequence, and then add 11 multiplied by the number of sequences to FORM. 2 sequenced textures would be 22 extra bytes (0x16 in hexadecimal), 3 sequenced textures would be 33 extra bytes (0x21), etc.[1] Make sure to only edit the SURF and TIMG entry or entries that contain your sequenced textures.
Alternatively, you can avoid most of the above by initially changing the file name of the first BMP in the sequence to have 11 extra characters. After the texture has been applied to the model, you can open the LWO file and delete the extra characters to make space for the (sequence) flag, without the file length being affected. Another option is to simply add " (sequence)" to the BMP file name before adding it to the model, then edit the LWO to move the placement of .bmp. Example: rename the first file in the sequence abc from abc001.bmp to abc001 (sequence).bmp, then once the LWO file has been saved edit the texture's entry to now read abc001.bmp (sequence). Be sure to rename the BMP file to remove " (sequence)" or any other extra characters before adding the files to the game.
Optional IMSQ fix
Optional: When saving a sequence using LightWave 5, the LWO file will contain an IMSQ chunk after the two null characters following the texture path. LEGO Rock Raiders does not require this data to display sequenced textures, but LightWave does, and sequences added using the above hex editor method will not be loaded (LightWave will think that (sequence) is part of the file name without an IMSQ ID tag). If you want to make your model fully compatible with LightWave, you can add this chunk after each sequence entry; this will add an addition 12 bytes (0x1C) per entry to FORM, SURF, and TIMG. The values following IMSQ are:[2]
- 2 bytes: The length in bytes of the
IMSQentry. Always00 06. - 2 bytes: Frame Offset. Default is 0
- 2 bytes: Loop Sequence and Interlaced options.
00 00for all disabled (default),00 01for Loop Sequence checked,00 02for Interlace checked,00 03for both. - 2 bytes: the Sequence Loop Length. Default is 30 (
00 1E), though you may want to change it to be the length of the sequence used.
The default hexadecimal data added would be 49 4D 53 51 00 06 00 00 00 00 00 1E. However some files in Rock Raiders have Loop Sequence enabled and the Sequence Loop Length set to a different number, likely based on the length of the sequence.
Tips
Some important tips to remember, especially if you are new to hex editing:
- When editing values, make sure that you are overwriting the existing numbers rather than adding new ones, or the file's structure will be corrupted and it will be considered invalid.[1]
- Remember that each hexadecimal byte is written as two digits, so you will need to add a leading zero if your value has an odd number of digits; for instance, if your calculator gives you a value of 1A4, you will need to write it in the file as
01 A4.[1] - All values in LWO files big-endian, so you will not have to to swap the byte order of your calculated numbers like when editing little-endian files. (Example: 1A4 written in four bytes would be
00 00 01 A4in big-endian order, andA4 01 00 00in little-endian order.) The latter is used in some other binary files in Rock Raiders, such as map files and the WAD headers.
References
- ↑ 1.0 1.1 1.2 1.3 1.4 1.5 1.6 1.7 1.8 Cirevam (December 20, 2017) [October 14, 2017]. "Animated Textures on Models". Rock Raiders United. Archived from the original on November 13, 2024. Video version available via YouTube.
- ↑ 2.0 2.1 2.2 2.3 2.4 2.5 2.6 "LightWave 3D Object File Format". October 16, 1996. Archived from the original on 22 February 2005.
- ↑ Scott, Dean A.; Vost, Ben (11 September 2024) [2002]. "LightWave History: All the versions of LightWave - so far". LightWave 3D. LightWave Digital. Archived from the original on 26 November 2024. Retrieved 30 November 2024.